Tag Archives: i made this

Recipe: Buffalo chicken baked potatoes

Standard
Recipe: Buffalo chicken baked potatoes

I’m really falling in love with how easily my crockpot allows me to make shredded chicken. Seriously. Just put in chicken breasts and whatever seasoning you want and turn it on high for two hours. Then tear it apart with forks. Put it on tortillas, pasta, rice — whatever makes sense for the seasoning or sauce you used.

I came up with this recipe when I needed to use up some cream cheese and some baking potatoes. I’ve ordered buffalo chicken baked potatoes in a restaurant before, but have always been slightly disappointed. Obviously they’re still delicious, but just not exactly what I was hoping for.

So to make this: I put a giant chicken breast in the crockpot. Then in a bowl, I mixed together Philadelphia chive & onion cream cheese spread, Sweet Baby Ray’s buffalo wing sauce and shredded cheddar cheese. I know: When sharing a recipe, it’s good to give exact amounts. But that’s not exactly how I cook. I used most of the cream cheese in the container, a handful of the cheddar cheese, and kept adding the wing sauce until I liked the color of it. (Yep, that’s the exact measurement. Add buffalo wing sauce until you like the color of the mixture.) (The cheese mixture itself would be safe to eat without cooking, so you could add sauce to taste [if you are capable of just tasting a buffalo cheese mixture without tearing open a bag of tortilla chips to devour the entire thing].) Then I spread the cheese mixture over the chicken, put the lid on the crock, set to the crock to high, and let it cook for about two hours. At that point, I checked the internal temperature and found the chicken to be cooked through. So I shredded it, turned the crock to low, and let it sit so the flavor would continue penetrating the chicken.

Meanwhile, I nuked the baking potatoes in the microwave. When the potatoes were finished, I split them and topped them with the chicken. Then on my plate, I mashed it all together:

buffalo chicken baked potato


I loved the flavor of this. You should, too, if you love buffalo chicken dip and baked potatoes. My boyfriend’s feedback: “Is there any more of this?” and “Can you make more of this next time?”

Next time, I would definitely make it with more than one chicken breast, and don’t think I would need to adjust the amount of cheese too much (probably just use the full container of cream cheese).

I’m also looking at the potential of the other cream cheese spread flavors with chicken in the crockpot. That jalapeño spread could be an easy way to make flavorful shredded chicken for soft tacos. There’s something there with the pineapple spread, too.

Organizing owners manuals

Standard

Real Simple‘s Room by Room Organizing includes the best tip ever for getting all of your owners manuals all in a row: Filing them in clear pockets in a binder divided by room.

DUH. WHY DIDN’T I THINK OF THAT.

I purchased a binder, clear pockets and dividers for less than $10, and after they sat on the chair in my living room for approximately two months, I finally spent 20 minutes putting the pockets and dividers into the binder, and grabbing all of my owners manuals whatever owners manuals I could find to file in the appropriate rooms.

Since then, as I’ve been spring-cleaning and coming across additional owners manuals, etc., it’s beyond easy to open the binder and file. In addition to owners manuals, I’ve filed care instructions for different items throughout my house. AND in doing this, I’ve discovered paperwork for items I no longer own and can discard.

The kitchen section of my binder

Organized-tabs

A closer look at the tabs — though the lighting is terrible, so it’s not as though you can see much.

This is honestly the easiest organization project to implement and stick to. It took almost no work to execute and basically no effort to maintain. And, best of all, it’s so simple to find exactly what you need (provided that you filed it appropriately).

The other great thing about this project is that it’s easy to adapt to your own living situation. You can purchase as big of a binder as you need and as many dividers as you have rooms (or even subdivide the rooms based on type of item).

Green smoothies: My new breakfast obsession

Standard

I started making smoothies for breakfast last summer when I was buying tons of fruit at the farmer market. Now, I am having them every day — either at breakfast or as a post-workout meal — and I cannot tell you enough how much I love them. These smoothies are an incredibly easy way to get fruits and vegetables in your diet, AND you can eat breakfast while getting ready in the morning because it’s so simple to sip (or, take on the road with you if you are a breakfast-on-the-go type of person).

I know there’s a lot of information out there about smoothies, so here is what I have lived and learned over the past nineish months:

I invested in a good blender. I had been using a cheap blender that I had since college, and one morning it broke and that was the saddest start to a day as I watched my breakfast spill all over and then had to hangrily clean it up. I now have the Oster Designed for Life 7-Speed Blender, which is currently $59.88 (it was $10 less when I got it in November!). If you’re going to be using it every day, you want to make sure that it’s going to hold up. (I know Vitamix is a super trendy thing now, but I honestly don’t know anything about them, except that they are made in Cleveland and cost more than I have spent on anything that wasn’t rent, a car or a computer. I would like to hear a good explanation for why this is a better blender than the one I spent $50 on.)

I always add greens. I put a handful (or two) of spinach in every smoothie. It’s approximately a cup, but I can’t figure out how to properly measure spinach without a food scale, which I don’t have (probably another kitchen tool I should invest in). Last summer, I was adding kale that I had bought from the farmers market, but my cheap college blender didn’t do very well with it, which meant my smoothies turned out leafy. I’m definitely ready to give kale another try, now that I have a blender that will better handle the curly leaves.

I use 1 cup of almond milk — unsweetened. I had been rotating between skim milk, nonfat yogurt, Greek yogurt and no dairy, but purchased some almond milk after a suggestion from my mom. Of course, I bought sweetened vanilla almond milk, which made my smoothies taste like dessert for breakfast. Which was awesome. But, buying the unsweetened vanilla almond milk saves 50 calories a day, which is 350 calories a week, which is a pound every twoish months. The first smoothie after switching to unsweetened was quite a taste adjustment, but I’ve gotten used to it now, and …

… I am adding 1/4 cup of quick-cooking oats (uncooked) to my smoothies, which actually makes them a bit sweeter, somehow. Since I am having the smoothies as a meal, I wanted to make them more filling. This is a change I just made last week, and I am loving it.

I use half a banana and 1 cup of mixed fruit. Because it’s been winter, I’ve been buying a lot of frozen berries (which eliminates the need for ice cubes, so you can pack your glass with more nutrients), or getting whatever fruit is on sale. I’ll buy a few bunches of bananas at a time, and usually let them ripen to freeze before using them. Most of the time my smoothies are some combination of strawberries, blueberries, raspberries, pineapple and mango. (Please, tell me your favorite combination! I’m always looking for new tastes.)

Edit [April 19, 2014]: The half banana, one cup of fruit, one cup of spinach, 1/4 cup of oats and 1 cup of unsweetened vanilla almond milk is approximately 300 calories. That’s the amount all my magazines say to aim for at breakfast if you are looking to lose weight (and 400 calories at lunch, 500 at dinner and two 100-calorie snacks during the day).

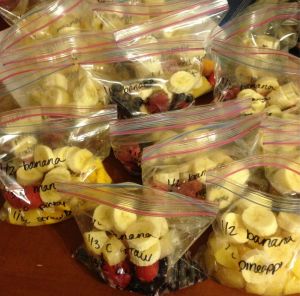
I came across this wonderful idea on Pinterest of portioning out your smoothies into baggies, then freezing them so you can just drop them in the blender in the morning without needing to measure out all of your ingredients. This has been the most incredible time-saver. One Sunday last month, I spent about an hour labeling bags and measuring out the fruit — which resulted in three weeks of breakfasts:

Smoothie-prep

I don’t freeze the greens with the fruit, and I haven’t done the oats (since that’s a new thing I just started last week), but I don’t think that’s really necessary. The greens (and almond milk) are something I have on hand every day anyway, and I know exactly how much oats to measure into the blender. I’m not sure how well the oats would freeze well, anyway. The big time saver with this is that I don’t have to think about what to put in the smoothie and then spend time prepping the fruit. It’s all already done! Labeling the baggies is a good way to avoid mysteries in the freezer, as well as the best way to know what you’re consuming if you’re logging meals or counting calories.

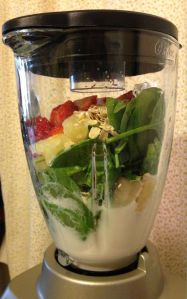
Here’s the smoothie I made yesterday:

Smoothie-blender

Banana, pineapple, strawberries, spinach, oats and almond milk.

Smoothie-glass

Trust me, you don’t even taste the spinach.

Chickpea Feta Salad

Standard

One of the first recipes I found and repinned when I joined Pinterest was this Chickpea Feta Salad from the blog Teenage Taste. Twenty-one weeks after pinning it, I just made it for the third time. Of the 180+ recipes I’ve pinned, I’ve made fewer than 10, so obviously this stuff is good.

The salad is chickpeas, cherry tomatoes, basil, garlic and feta cheese, tossed in a dressing made of olive oil, red wine vinegar and sugar. If all that sounds good to you, head over to Teenage Taste to get the full recipe.

She recommends refrigerating it for a few hours before eating so the ingredients can marinate. Probably a good idea, but I am always so excited to eat it that I have a bowl right away. It does taste better colder and marinated. Also this time around, I used a brand of chickpeas I’ve never seen before, and I don’t think they taste as good as usual. But this salad not-tasting-as-good-as-usual is still pretty good.

Fruit salad bowl for a baby shower

Standard
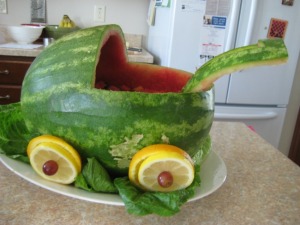
Fruit salad bowl for a baby shower

You know how the rhyme goes: First comes love, then comes marriage, then comes a watermelon baby carriage. Or something like that.

I became an aunt two months ago. But before that exciting day, I helped to plan my sister’s baby shower. It was a pretty nice party, and I have to give credit to my mom and longtime friend Sarah, who allowed us to have the shindig in her beautiful home. My mom did a great job of finding tips and suggestions, including one for a neat way to serve fruit salad: in a watermelon carved to look like a baby carriage.

I felt a little intimidated by the project, but I thought that the two of us together would be able to pull it off (and if we couldn’t, we could just put the fruit salad in a bowl and pretend we never even tried the thing).

First, you’ll want to find a watermelon with a flat side that can be the bottom so it won’t roll as much.

watermelon

Our watermelon

It would probably also be a good idea to get one that isn’t too long so that way it is easier to scoop fruit out of. Clean off the outside of the watermelon.

Next, you’ll need to cut out a quarter of the watermelon – halfway longways and halfway wideways. My mom had the genius idea of using pumpkin-carving tools, which made it super easy. The serrated knife broke through the rind into the fruit without any trouble.

cuts in watermelon

After cutting the melon. See how easy that was?

Then you want to remove the quarter of the watermelon you just cut out.

watermelon in two pieces

That’s the easy part

Next, scoop out the melon as you would normally do – though it is a little trickier to carve the fruit out of half of the watermelon. Get all the fruit out of the part you cut away, but do not discard that rind. You’ll need it in just a moment.
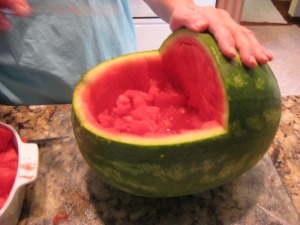
scooping out the watermelon

This is also the easy part.

My mom found it easier to kind of cut slices within the melon to get it out, but that might have been because our watermelon was super, super juicy. Super juicy watermelons are delicious, but for this project it proved to be quite drippy as well.

hollowed-out watermelon

All clear!

After you’ve hollowed out the watermelon, you need to create a handle for the carriage. I didn’t get a photo of cutting out the handle (because I only have two hands, you know?). Some of the books and blog posts we read had recommended having the handle be at least an inch wide on all sides so that it was sturdy. I tried to keep in mind having it five inches wide at the top (where you would put your hands on a carriage) and three inches wide on the bottom. I kind of just winged it, tracing an outline with the pumpkin-carving knife and then just cutting. You’ll be able to see my work in the photos below.

Then comes the more difficult part: Attaching the handle to the watermelon. We used toothpicks, but they were breaking and getting soggy. My mom somehow finagled them into place. I’m sure there is a gadget or a doohickey that will work better than the toothpicks. Maybe plastic toothpicks – the kind that are shaped like swords.

attaching the handle to the watermelon

Mom hold the handle in place before attaching it

See how the handle is curved? It’s wider at the top than at the bottom, and I just cut out the middle. It wasn’t terribly hard to do, but you only get one shot at it (unless you bought a second watermelon).

We waited to attach the handle until we got to the party location. This whole project would probably be easiest to do on location – so as not to break the carriage in transport – but if that’s not possible, do all your fruit prep and carriage carving before heading to the party site.

The watermelon will need to sit on a dish that can catch all the juice from the fruit. For it to do that, you’ll also need to poke holes into the bottom of the carriage for the juice to leak out. Strategically put the holes where you would see wheels on the carriage. We also lined the dish with lettuce, which looks like grass AND hides the fruit juice. Now the body of the carriage is ready.

Next, you’ll want to attach the handle. After the handle come the wheels. We used four slices of orange, four slices of lemon and four grapes to create the effect of wheels. With your trusty toothpick (or whatever better doohickey you have), layer the wheels with a slice of orange against the melon, then a slice of lemon, then a grape to cover the tip of the toothpick (or whatever … ours didn’t quite work out that way because we struggled to get the fruit to stick on).

Then add the fruit, and a spoon for serving.
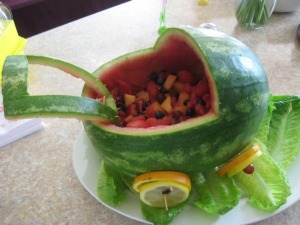
finished carriage

A shot of the finished carriage

side shot of the carriage

A side shot of the finished carriage

Several of the party-goers complimented the carriage, and the mother-to-be loved it. My biggest regret is that I forgot to embellish the top of the carriage. I found several photos online of curvy designs and had wanted to do my own, but it slipped my mind in the rush to get everything together. It would have been a nice touch, but I’m definitely pleased with the way it came out. If I throw another summertime baby shower, the watermelon baby carriage fruit bowl will be on my list.

The watermelon part of the process probably took about an hour total for the two of us to do, but you’ll also need to add in time for the fruit prep. We had additional containers of fruit ready to refill the carriage when it got low.

What’s a baby shower project that you’ve done? How did it turn out?