I do like Christmas music, but mostly specific recordings of certain songs — the ones that were on a couple of the CDs my parents would play every December. And the Michael Bublé Christmas album. Near the top of that list is Donny Hathaway’s “This Christmas.” I’ve listened to this Outshot from a 2012 episode of Bullseye with Jesse Thorn probably a dozen times and feel like I should just keep reminding people of it every December. It’s a perfectly succinct explanation of why this song is so wonderful.
Category Archives: Media
Football by Elizabeth Crane
I love love love the story “Football” by Elizabeth Crane, and how the reader reads it. Do yourself a favor and set aside 14 minutes today to listen to it.
Thanks, @GetGlue!
I’ve been on GetGlue for close to a year and in that time have earned 63 stickers. Every 20 stickers you earn, you can have *real* stickers mailed to you. I was eager to get the stickers when I first logged on, but then kind of forgot about it until a couple of weeks ago when I realized I was nearing a third batch of real stickers. So I finally requested them, then promptly forgot — until I got the mail yesterday and had an envelope from GetGlue. Neat!
My first batch isn’t too exciting because a lot of the stickers are the initial “good job you checked in!” and “good job you like stuff!” stickers. And I got a Nicholas Sparks sticker which is cool-looking though also embarrassing that I admitted to checking in to a Nicholas Sparks item. My next two batches of stickers will be more fun because I’ve earned stickers like Archer: Heart of Archness, Community: Advanced Gay and Parks and Recreation: Smallest Park.
Suggestions for what to do with my stickers?
Fruit salad bowl for a baby shower
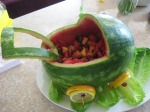
You know how the rhyme goes: First comes love, then comes marriage, then comes a watermelon baby carriage. Or something like that.
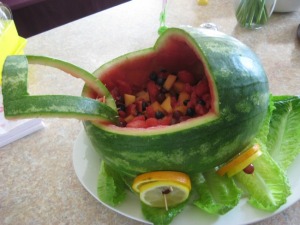
I became an aunt two months ago. But before that exciting day, I helped to plan my sister’s baby shower. It was a pretty nice party, and I have to give credit to my mom and longtime friend Sarah, who allowed us to have the shindig in her beautiful home. My mom did a great job of finding tips and suggestions, including one for a neat way to serve fruit salad: in a watermelon carved to look like a baby carriage.
I felt a little intimidated by the project, but I thought that the two of us together would be able to pull it off (and if we couldn’t, we could just put the fruit salad in a bowl and pretend we never even tried the thing).
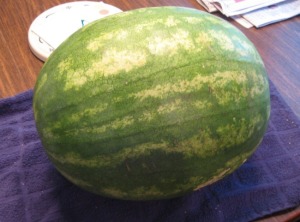
First, you’ll want to find a watermelon with a flat side that can be the bottom so it won’t roll as much.
It would probably also be a good idea to get one that isn’t too long so that way it is easier to scoop fruit out of. Clean off the outside of the watermelon.
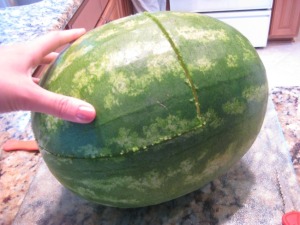
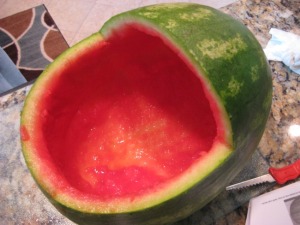
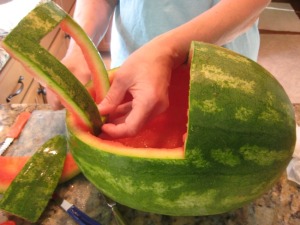
Next, you’ll need to cut out a quarter of the watermelon – halfway longways and halfway wideways. My mom had the genius idea of using pumpkin-carving tools, which made it super easy. The serrated knife broke through the rind into the fruit without any trouble.
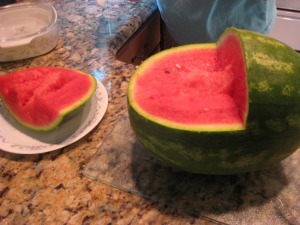
Then you want to remove the quarter of the watermelon you just cut out.
Next, scoop out the melon as you would normally do – though it is a little trickier to carve the fruit out of half of the watermelon. Get all the fruit out of the part you cut away, but do not discard that rind. You’ll need it in just a moment.
My mom found it easier to kind of cut slices within the melon to get it out, but that might have been because our watermelon was super, super juicy. Super juicy watermelons are delicious, but for this project it proved to be quite drippy as well.
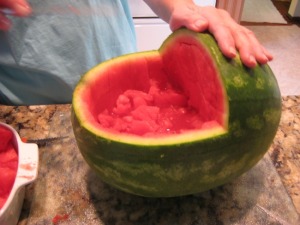
After you’ve hollowed out the watermelon, you need to create a handle for the carriage. I didn’t get a photo of cutting out the handle (because I only have two hands, you know?). Some of the books and blog posts we read had recommended having the handle be at least an inch wide on all sides so that it was sturdy. I tried to keep in mind having it five inches wide at the top (where you would put your hands on a carriage) and three inches wide on the bottom. I kind of just winged it, tracing an outline with the pumpkin-carving knife and then just cutting. You’ll be able to see my work in the photos below.
Then comes the more difficult part: Attaching the handle to the watermelon. We used toothpicks, but they were breaking and getting soggy. My mom somehow finagled them into place. I’m sure there is a gadget or a doohickey that will work better than the toothpicks. Maybe plastic toothpicks – the kind that are shaped like swords.
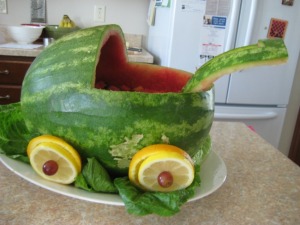
See how the handle is curved? It’s wider at the top than at the bottom, and I just cut out the middle. It wasn’t terribly hard to do, but you only get one shot at it (unless you bought a second watermelon).
We waited to attach the handle until we got to the party location. This whole project would probably be easiest to do on location – so as not to break the carriage in transport – but if that’s not possible, do all your fruit prep and carriage carving before heading to the party site.
The watermelon will need to sit on a dish that can catch all the juice from the fruit. For it to do that, you’ll also need to poke holes into the bottom of the carriage for the juice to leak out. Strategically put the holes where you would see wheels on the carriage. We also lined the dish with lettuce, which looks like grass AND hides the fruit juice. Now the body of the carriage is ready.
Next, you’ll want to attach the handle. After the handle come the wheels. We used four slices of orange, four slices of lemon and four grapes to create the effect of wheels. With your trusty toothpick (or whatever better doohickey you have), layer the wheels with a slice of orange against the melon, then a slice of lemon, then a grape to cover the tip of the toothpick (or whatever … ours didn’t quite work out that way because we struggled to get the fruit to stick on).
Then add the fruit, and a spoon for serving.
Several of the party-goers complimented the carriage, and the mother-to-be loved it. My biggest regret is that I forgot to embellish the top of the carriage. I found several photos online of curvy designs and had wanted to do my own, but it slipped my mind in the rush to get everything together. It would have been a nice touch, but I’m definitely pleased with the way it came out. If I throw another summertime baby shower, the watermelon baby carriage fruit bowl will be on my list.
The watermelon part of the process probably took about an hour total for the two of us to do, but you’ll also need to add in time for the fruit prep. We had additional containers of fruit ready to refill the carriage when it got low.
What’s a baby shower project that you’ve done? How did it turn out?
Happy Halloween!
Goodbye, iBook G4
I had been thinking for a while about getting a new computer, and two weeks ago my iBook G4 made the decision that it was time for me to do it.
I was doing some pretty harmless non-intensive work on Firefox – starting a new project – when the Click That Wouldn’t Stop began. I could move my mouse, but the computer wasn’t responding to typing, command+tabbing or mouse-clicking, so I did a hard shut down. I waited a few moments, then pushed the power button again. White screen, then, is that the sound of the hard drive booting up? No, it’s the Click That Wouldn’t Stop. Another hard shut down. Another waiting a few moments. Another pushing the power button. Another Click That Wouldn’t Stop. I repeated the process a few times to ensure that yes, my computer was not turning back on.
After some panicked crying, I made an appointment for the Genius Bar. When I got to the appointment a day and a half later, I think the Genius helping me had to hold himself back from laughing at my ancient equipment. He even referred to it as something like that. He told me what I knew in my heart was true – that it wasn’t going to come back on without a new hard drive.
My iBook G4 came to me seven years ago, the summer between my sophomore and junior years of college. It lasted me through two years of undergrad, two years of living on my own, two years of graduate school and beyond. I logged probably thousands of hours, typing millions of words in dozens of research papers, columns and essay tests. It made it through several moves and outlasted some friendships and some boyfriends. Heck, it was older than my cousin. I knew it wasn’t worth it to put in a new hard drive, and I sighed deeply looking over the pricetags of the flashy new Macbook Pros that I had been eying for a while anyway.
A week and a half into not having a computer, I was getting antsy to get a computer. And something work-related came up that kind of mandated that I get a new computer STAT. So thankfully I have a tech-geek BF who had spent the better part of the month of August researching what kind of computer I should get. I eventually settled on the 13-inch MacBook Pro, and the BF found it for $200 less at Micro Center. Yes, and yes.
So today I put the biggest charge ever on my credit card (after paying off the entire balance the day before) and walked out of Micro Center hugging my new computer.
So far everything seems good with the new machine. Now I just need a case* so I can take it with me to Starbucks, where I can blog and people watch with my earbuds in.
For now, I might just play with Photo Booth.
*Also, to transfer my files from my external hard drive to this computer, but that seemed like a much bigger project than I had the energy for today.
